When you install an SSL onto an Addon Domain in cPanel hosting, it is not an automatic install like it is with the primary domain for the hosting account.
You will have to manually setup, create, and install the SSL on the Addon Domain. That is what I will walk you through below.
Note: This tutorial will also apply to anyone setting up a 3rd party SSL on a cPanel hosting account.
Ready to Do-it-Yourself?
In this tutorial you will be managing two different products.
- The SSL Certificate
- The cPanel Hosting
This tutorial is done from a GoDaddy account where both the hosting and SSL live. The same steps would apply no matter where your cPanel Hosting and SSL were purchased.
Step 1: Start the setup in cPanel
[videopress 78PMdvzJ w=800]
- In the search bar type SSL
- Click on the “SSL/TLS” icon

Once in the SSL/TLS manager, you will have a total of three (3) steps to complete. After completing step 1 below, you will have to switch back over to the SSL Manager. Each of the steps below are outlined in individual screenshots.

Step 1.1: Generating a CSR
- In the drop down, select Generate New…
- Enter your domain name you want this SSL to cover
- Enter the City of business or mailing address
- Enter the State your business is registered in
- Chose your Country from the drop down
- Enter the company name (if no company enter your name)
- Company division would be your role; i.e Owner, Marketing, IT
- Enter the best email address for contacting you
- Click “Generate”
Passphrase and description are optional.


Step 2: Use the CSR to Generate the SSL Cert
After clicking Generate in the previous step, you will see the page as displayed below.
Copy the strange looking text in the gray box

Step 2b: Generating the SSL Certificate
[videopress ZDPsDnYj w=800]
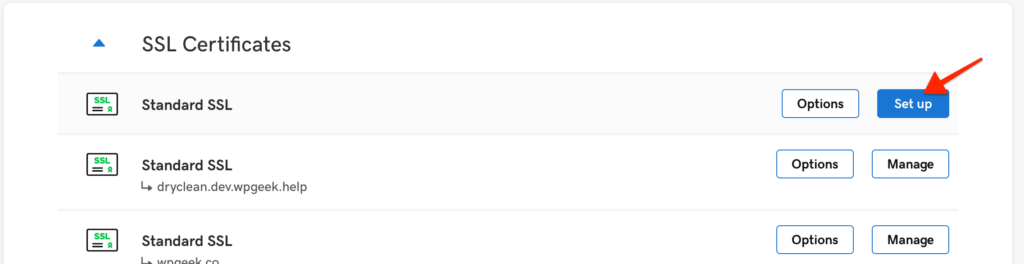
Head back over to the section of your account where you manage your SSLs.
Click “Setup”
After clicking on Setup, you will be presented with the following…
- Select “Input a CSR”
- Past that strange looking text (your CSR) in the box
- Click “Continue”

After clicking on Continue, you will be presented with the following…
- Chose your “Certificate Authority” (doesn’t matter which you pick)
- Check that you agree to the terms
- Click “Continue”

After clicking the “Continue” button again, you will see the screen displayed below.
This means you did it right!

Step 3: Installing your certificate on cPanel
[videopress gtjXoDlU w=800]
Once the SSL Certificate has completed verification, it will issue a certificate and you will see the screen below.
- Click “Download”

After clicking download you will be presented with two additional steps.
- In the drop down, select your “Server Type”. In my case, “Apache”.
- Click “Download Zip File”

Once the zip file is downloaded to your computer and unzipped, you will have two files.
Very Important => You want to use the file that is a random string of numbers and letters. NOT the one titled gd_bundle-….

Step 3b: Uploading the SSL Cert in cPanel
[videopress FcRzIlU3 w=800]
Once the files are extracted on your machine, head back over to cPanel to the SSL/TLS section and click on the third option, “Certificates (CRT)”. Then follow the steps below.
- Click on “Choose File”
- Locate the file on your machine and select it
- Click on “Open”
- Click “Upload Certificate”

Step 3b: Installing the SSL Cert in cPanel
[videopress xxM6srKS w=800]
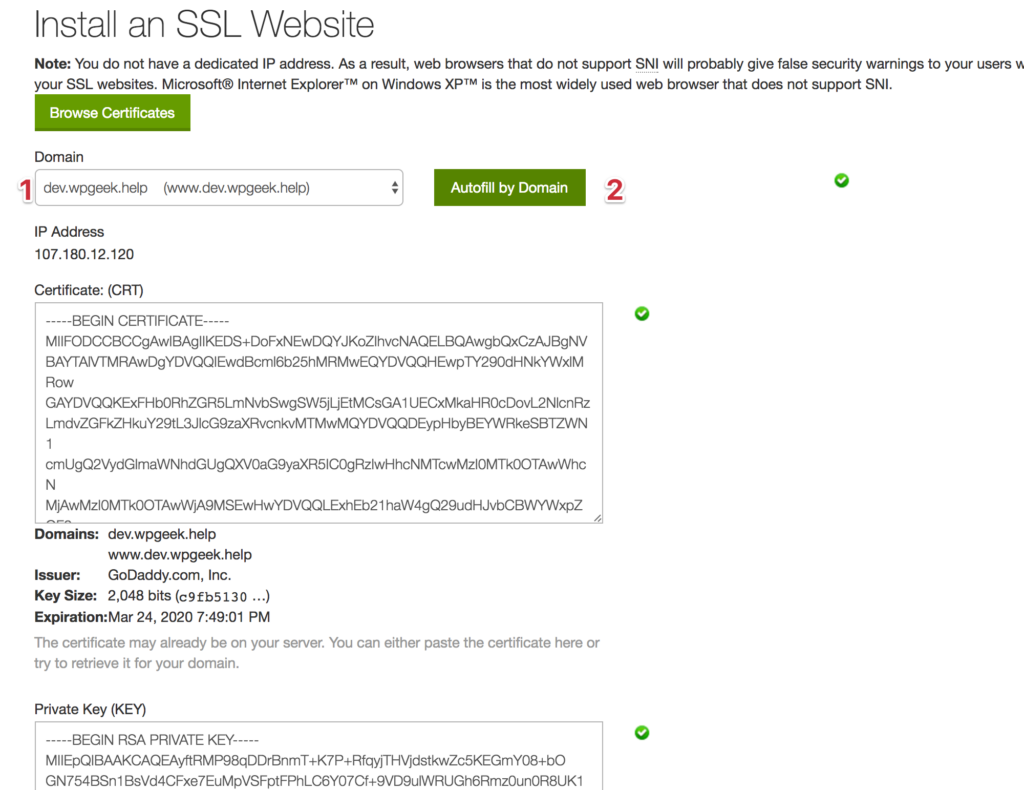
For the final step, you have to install the certificate. In the cPanel SSL/TLS section, go down to the last option “Install and Manage SSL”.
- In the drop down, select your domain
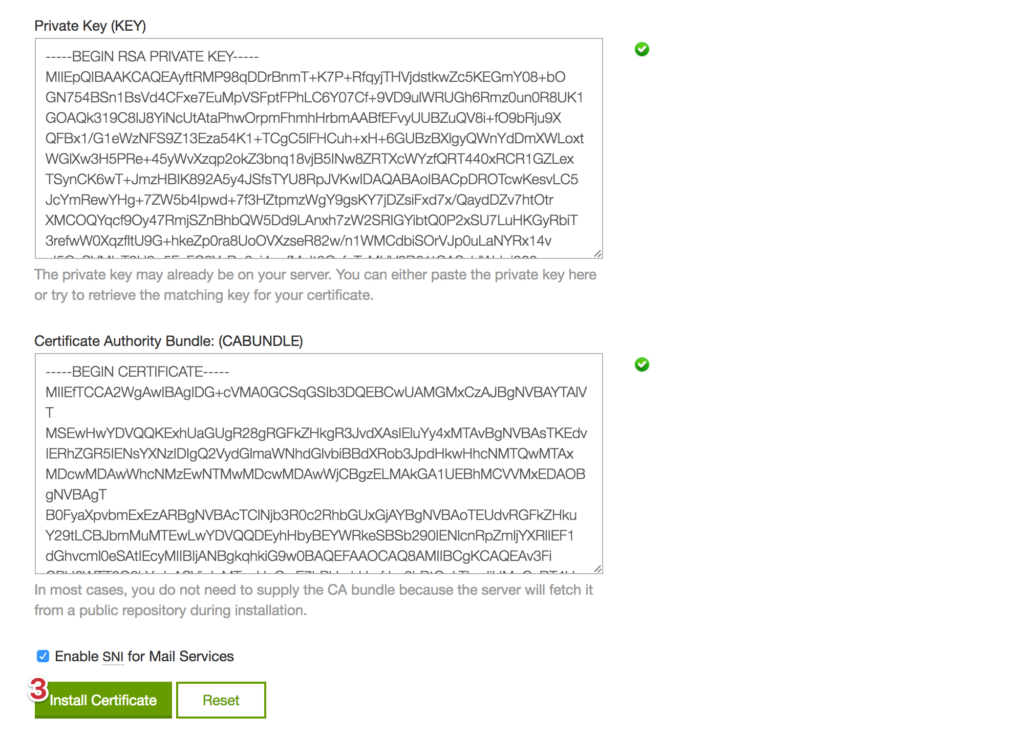
- Click on “Autofill by Domain” (verify all boxes are populated and hve green check marks)
- Click “Install Certificate”
When you see the message below, you will know that your SSL is installed and configured properly.
Your site will now resolve to HTTPS and show the green padlock.

Wrap Up and Review
You’ve just learned something not many people know how to do! Hopefully you found it easier than you thought it would be.
If you’re determined to get this done yourself and have additional questions or concerns, use the comments below and I’ll be happy to help you get things sorted out.
Thank you so much! Your tutorial is way better than godaddy. I wish I had found this a long time ago.
Hey Tammy,
Glad I could help. Let me know if there is anything else you need help with.
— Chirs
Perfect. Thanks. you’re the best.
Way better than the (not worth promoting their name) Co. that had No idea how to do this.
, Sincerely
Lionel
Exactly why I wrote it! Glad you found it. Thanks for leaving a comment to let me know.
— Chris
Bro, I have to thank you a million times for this guide. You just saved my day my man. Wish you a fortune ahead of you.
Elven, Thanks for the feedback!! Really glad I could help!
— Chris
Hi, great article.
I have followed exact procedure to install SSL for my sub domain.
But it doesnt work and still shows not secure.
everything seems to be OK, green ticks etc. details of cert.
I have tried contacting godaddy and cert issue company to no avail.
Have you tried checking sslshopper.com to see if there is cert assigned to your domain? What is the sub domain?
Sslshopper shows invalid n expired certs. When checked from within godaddy certs are shown ok.
Subdomain is http://www.shalooka.com
And it is not the primary domain on control panel.
I do get error couple of times when installing certs that IP address is bound.
Thanks, this was very helpful!
videos do not open, I took all the steps. ultimately failed. The certificate appears in the SSL / TLS section. But the secure key has not been activated.
Sorry this didn’t work for you. I am not able to duplicate any issues with the videos…If you want to share your URL where you’ve installed the cert I can check it and try to tell you the specific issue.
– Chris
Incredibly helpful, thanks Chris!
Hey Rich…Thanks for the feedback!
– Chris
Worked for me, except for digging around a bit to find my CPanel. GoDaddy’s tech support chat window sent me here. Thanks for posting this!
Hi Lam,
Thank you for your comment and feedback. Appreciate you taking the time to let me know!
– Chris
Thank you very much Chris. You helped me a lot. God bless you.
¡Saludos! Muy útil consejos dentro de esta Poste! Es la que harán cambios.
Muchas gracias por compartir!
De nada
Brilliant!! Why isn’t this on GoDaddy’s site????
You saved my bacon 😉
thank you! you are an angel